Nested ESXi on PROXMOX
Motivation
The reason is to reuse hardware that is no longer used, such as old laptops or desktops, to be able to virtualize with ESXi from VMware.
The main problem that arises is that the hardware requirements of this type of device do not allow the installation of VMware ESXi, mainly because of the network card, which is normally a Realtek, or because of the processor.
So, if we want to have ESXi on this type of device, either for the lab or because you feel like it, you have to install it nested in another hypervisor.
In this manual, we will use the level 1 hypervisor called PROXMOX.
You can find more information about PROXMOX on its website: https://www.proxmox.com/en/
And , Why PROXMOX, its simple. If a level 2 hypervisor is used, such as Oracle's Virtualbox or VMware Workstation, we have the OS layer where we install it and with PROXMOX directly, the virtual machine that will be the ESXi will not have as much software layer to reach the HARDWARE.
Materials
Hardware
- Laptop HP Probook 450 G5 8 x Intel(R) Core(TM) i5-8250U CPU 1.60GHz / 16 GB RAM
Software
- ESXi 7.0.3
Lets do it!
Access to Proxmox web console
Once inside the console, in Summary, we see the amount of RAM that PROXMOX is consuming on the laptop. As it is using 1 GB out of 16 GB, for the ESXi we will assign 12 GB and leave a margin in case PROXMOX needs it.

Select the local disk where to store the image.
Select ISO Images and press "Upload"
Upload the ESXi image.

Create VM for ESXi
Push the botton "Create VM"

A virtual machine creation wizard opens. Give the machine a name, and click to start the virtual machine when you start PROXMOX.

Select the ESXi image.
In Guest OS you have to select "Other", otherwise it will not load the disk in the ESXi installation.

In System, we leave by default.

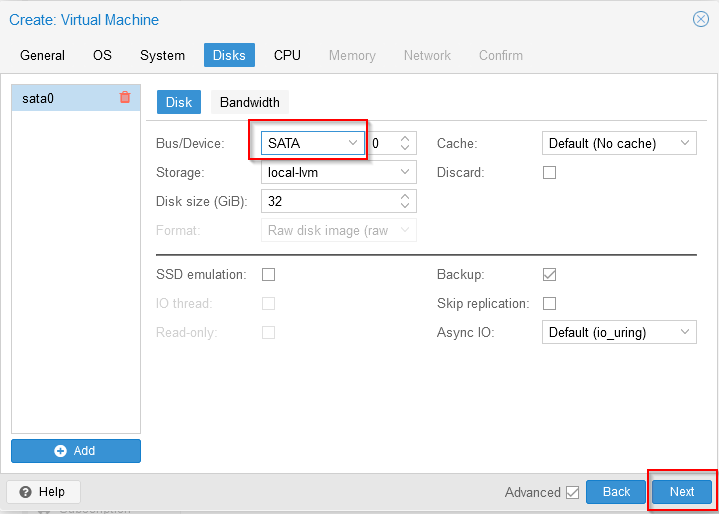
In "Disks", select SATA Bus Device
In CPU, we will select 1 socket and 6 Cores. The laptop where we carry out this test has 8 Cores, 2 are left for PROXMOX.
In "Type", you have to select "host" or else it will give an error when loading the installation ISO.
Tip: Virtualizing another CPU will give the same error.

In Memory, select 12 GB

In Network you have to select the Model "VMware vmxnet3", or the installation will give an error saying that the network card is incompatible.

Finally a little summary. Press "Finish"

Start VM and install ESXi
It will not go into details about how to install ESXi, since it is included in this blog entry:
https://floppyvirtual.ticveintitres.com/2021/10/instalar-en-disco-local-esxi-7.html
To start the virtual machine, select the machine, and click where it says "Console".
Press the power button and press "Start"

Result

Finish

Comentarios
Publicar un comentario
Puedes escribirme una reseña aquí mismo, gracias.